Imágenes y textos de mis bayonetas antiguas y modernas pertenecientes a la República Argentina y demás países del Mundo.
Bayonetas Antiguas y Modernas - Ancient and Modern Bayonets
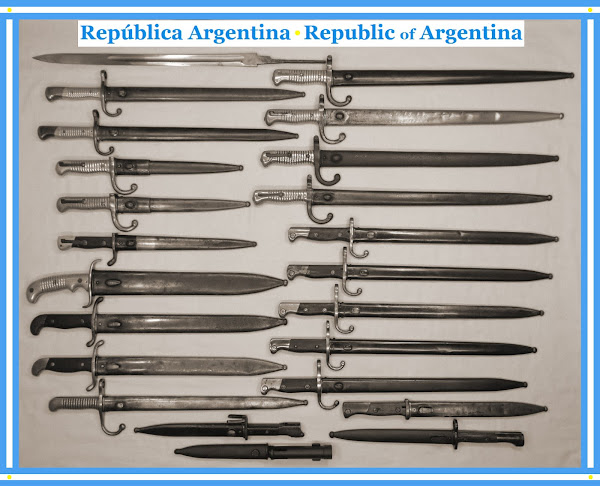
Cuadro de mi colección de bayonetas pertenecientes a mi país, incluyendo 3 machetes de Artillería - Picture from my bayonets collection belonging to my country, including 3 machetes for Artillery
Me dedico al Coleccionismo de Bayonetas. Además, al estudio de la Disciplina de Combate conocida como Esgrima de la Bayoneta (Mosquete con Bayoneta, Fusil con Bayoneta, y Fusil Táctico con Bayoneta). Y también a la investigación y aplicación de técnicas de Esgrima utilizadas en distintos tipos de Armas de Filo para poder aplicarlas correctamente a la Esgrima de las Bayonetas solas, sin acompañamiento de sus respectivas armas de fuego.
Iran Update, April 24, 2024
-
*Annika Ganzeveld, Johanna Moore, Andie Parry, Peter Mills, Kelly Campa,
Amin Soltani, and Nicholas Carl*
*Information Cutoff: 2:00 pm ET*
*The Iran Upd...
Nicolas Peyrac
-
* Il y aurait un "titre oublié"*
Et oui, je pense que *Trinidad*, face B de *Il y aurait du soleil *est tout
l'intérêt de ce petit 45 tours de *1977*, ca...
Do You Trust Them?
-
China is developing their own stealth aircraft fleet. If we think our
stealth aircraft will be effective, presumably theirs will be, too, right? Well,
th...
Актуально!
-
*Вышел в свет КЗД-2024 по Волгоградской области*
Дорогие друзья!
Актуальная информация для всех, кто интересуется краеведением, кто работает
по краеведческо...
New Knife - CJRB Prado
-
We knife aficionados are living in a good time, I often say. And not just
me, by the way. What is intended is that the availability of good knives at
dif...
Taimadera Princess Chujo Procession
-
當麻寺の練供養会式Taimadera Temple Procession of Golden Buddha Masks
*4/14 (every year). 16:00-. Near Taimadera Station. Free.*
Every year on the afternoon of April...
INDIO
-
Gigante colosal de los olvidos.
Memoria transitada de los vientos.
Dónde quedó tu nombre demorado…?
Tal vez, en el umbral de los silencios.
Por qué...
ARISS 40th Anniversary event starting Dec 16
-
ARISS is celebrating 40 years of human tended operations from space. STS-9
was the first time amateur radio was operated by a person while on orbit
back...
Марсоход Curiosity в осенней кампании 2023 года
-
Минувшей осенью марсоход NASA Curiosity, после успешной работы на высоте
"Gediz Vallis Ridge", вышел к руслу древнего горного потока, где взял
очередную п...
POR RAZONES PERSONALES VENDO LOS CDS DE TANGO
-
Por razones personales VENDO los cds publicados desde el 2009 los mismos
no tiene uso, porque solamente se convierten en MP3 y se suben a un
servidor....
Editing Completed
-
This morning, the last installment of The Complete Norwegian Folktales and
Legends of Asbjørnsen & Moe is going out to my patrons. That marks the end
of ...
Day 1 - 30 km Bridgwater to Weston-Super-Mare
-
A day of travel as I had to get back to Bridgwater and with a bit of luck
do a bit if cycling. I have a hugely ambitious target this year off
reaching Live...
-
Acaricio el diapasón
y apenas mi voz levanto
ya en el vergel de mi canto
florece la tradición.
Mi canto no es un malón
que viene a buscar pelea,
es ...
Abandoned Königstiger of s.SS.Pz.Abt.101
-
Image size: 2680 x 1429 pixel. 988 KB
Date: Friday, 1 September 1944
Place: Beauvais, Oise, France
Photographer: Unknown
Panzerkampfwagen IV ausf B Tiger ...
Machete N° 227: Navidad (Todo lo publicado)
-
*Portada de la revista Machete N° 227 - Diciembre de 2022.*
*"Todo sobre la Navidad" es un especial recopilatorio de lo publicado en la
revista Machete, s...
-
Llega la “Navegueta 2022” al MNA
*¿Cuándo?:* sábado 3 de diciembre
*¿En qué horario?:* de 10 a 17 horas
El evento surgió en 2012 como iniciativa del pil...
La Armada Argentina en Argentina Vuela 2022
-
Distintas aeronaves que forman parte de la Escuadrillas que forman el
Comando de Aviación Naval se hicieron presente en el evento Argentina Vuela
2022,...
Nominations for the 2022 Parliamentary Jazz Awards
-
The nominations have been announced today for the 2022 Parliamentary Jazz
Awards following the public vote and selection panel. The final winners
will b...
Una breve historia de la vacunación
-
Durante siglos, las personas han buscado formas de protegerse contra las
enfermedades infecciosas. Desde la práctica de la "variolización" en el
siglo XV...
Friends of Ukrainian Law Enforcement Coin
-
While a brutal and unjustified war initiated by russian federation is
unfolding in Ukraine, every little bit of help for the heroic country of
Ukraine...
Про стрелецких полковников
-
Многие исследователи, занимающиеся российскими вооруженными силами посл.
четв. XVII в., обращают внимание на то, что некоторые стрелецкие головы в
официа...
Schedule for 2021
-
Our first event at George Washington's Mount Vernon Revolutionary War
weekend, 1-2 May, was a huge success. Great weather, and it was nice to
see ...
The mighty Vasa galleon
-
In 1626 king Gustavus Adolphus of Sweden decided to built "Vasa", a
warship that Baltic sea have never seen before. He was very focused on his
naval fo...
ESTE AÑO, TRISTE DÍA DE ALEGRÍA EL MÍO
-
Por Ernesto Pérez Vera Tendría yo como 11 o 12 añillos cuando los Reyes
Magos me trajeron, por encargo de mi entrañable abuela y madrina
Visitación, el que...
-
De navegantes y transformaciones
Esta divagación arranca echando mano a un subgénero literario que me
gusta que es el de los epígrafes, esas frases de...
Los caballeros andantes de Martín de Riquer.
-
*Martín de Riquer. Los caballeros Andantes Españoles. Revista de Occidente
fundada por José Ortega y Gasset. Año III°, Segunda Época, Nro. 25. Madrid,
1965...
Erdinger Dunkel
-
Curiosamente, esta cerveza tiene su origen en 1989 cuando los maestros
cerveceros de Erdinger la crean como regalo de cumpleaños a uno de los
propietari...
Who Was H. P. Harrison & R P?
-
As much as we have studied the old rifle makers from here in this wonderful
state of West Virginia, we still don't have all the answers. They're so
many r...
The Battle of Guilford Courthouse:
-
A Battle Study by Marine Aviation Logistics Squadron 26 Written by:
Sergeant Christopher J. Borghese, Sergeant Ryan A. Curtis, Sergeant Timothy
K. Olmsted,...
Meteor integration on Rafale completed
-
The last live firing of the long range Meteor Missile was performed by the
Rafale B301 on April, 6 2017
This 4th test concludes the integration of the Mis...
Review: IKAR Taktika Redut-T5
-
Die Replica Redut T5 Veste von IKAR Taktika ist eine sehr hochwertig
verarbeitete Weste. Es wurde hauptsächlich robustes Cordura vernäht. Die
wichtigsten ...
Overall Historical Account
-
By Jaden Scheibeler
Like I've said, American Sniper is a real historical account. All of it's
content is accurately portrayed based on true events.
Chris ...
Sad News
-
On Saturday evening I received a call from the local hospital to say that
my father, Bill Lamin, passed away peacefully in his sleep. He fought a
long batt...
Crew unpacked the fresh fruit, opens Cygnus hatch
-
On Thursday morning 5:02 a.m, Commander Steve Swanson opened the hatch to
Orbital Sciences Cygnus cargo vehicle, to begin unloading a half of science
exper...
15. Die Spezialgrundausbildung beginnt...
-
Die Grundausbildung...drei Monate die mir wie eine Ewigkeit vorkamen.
Jetzt waren wir Gefreite! Nicht mehr die Kleinen, keine "Menschen-Anwärter"
mehr.
Wir ...
Swedish Mauser Related Old Postcard Again
-
*Soldiers with 1896 rifles somewhere in Sweden, approximately 100 years
ago. The photo is very likely to have been taken at the I20 infantry
regiment in ...
Recorriendo la provincia de Buenos Aires
-
*Bailando La Sajuriana en Cármen de Areco, en la conmemoración de los 197
años de su fumdación.*
*Fabián viste el uniforme del Almirante Guillermo Brown...
Chapter 1: Drafted - May 6, 1968
-
I was drafted into the United States Army on May 6, 1968 at the ripe old
age of 19 years, 6 months and 2 days. Government policy at the time was to
draft a...
sable-bayoneta MAUSER "Modelo Argentino 1909" 1ra versión / MAUSER "Argentine Model 1909" 1st Pattern saber-bayonet
¿Desean ver más imágenes de la sable-bayoneta ModArg09 1ra (MAUSER "Modelo Argentino 1909" 1ra versión)? Entonces los invito a que chequeen éstos links pertenecientes a mis blogs en donde agregué más imágenes de ésta bayoneta y... ¡mostrando la forma en que ésta se engarza! Espero que las disfruten (pronto estaré subiendo imágenes de una de sus sucesoras: la ModArg09 2da 2da). Would you like to see more images from the ModArg09 1st saber-bayonet (MAUSER "Argentine Model 1909" 1st. Pattern)? So, I invite you to check these links belonging to my blogs where I added more images of this bayonet and... showing the way it is fixed! I hope you enjoy them (soon I will be uploading images of one of his successors: the ModArg09 2nd2nd). http://bayonets-images.blogspot.com.ar/2016/03/mauser-modelo-argentino-1909-1ra.html http://www.solo-bayonetas.com/p/mauser-argentine-model-1909-1st-pattern.html
ENFIELD PATTERN 1856 "bar on barrel" saber-bayonet (Solingen model for Volunteers) Origin or destiny: United Kingdom Respective weapon: it was exclusively designed to fit the ENFIELD PATTERN 1856 "2 band" Short Rifle in .577 caliber and muzzle loading system. Both weapons, bayonet and rifle, were used by British Army Line sergeants and by certain specialized units, as British as from other countries, included in the famous American Civil War where they stood out with their full participation on both sides. Manufacturer and manufacturing date: it has the HEAD OF THE KING mark, the well known symbol used by several members of the WEYERSBERG family, famous sword smiths (also of sabers and other blade weapons) from the highly considered Solingen of Germany. Its estimated manufacture´s date is between 1856 and 1857 although there were specimens produced in later years (Note: you may have the possibility to acquire a bayonet of this type manufactured in 1858 or later, but you must know the features of its hilt attached way to get a correct identification: if it is a "bar on barrel" or "bar on band" bayonet; in the following points of interest I will perform a detailed description to note the difference between the two types of hilts which they let the right way of attaching to the rifle). Technical data: 22.79 inches blade length (579 mm) .43 in blade width (11 mm) 1.22 in blade heigth (31 mm) 5.24 in hilt length, included crossguard (133 mm) .85 in internal diameter of the muzzle ring (21,5 mm) 28.11 in overall length, included scabbard (714 mm) Identification Marks: right side on the blade ricasso shows the Head of the King which it was the exclusive mark from its manufacturer WEYERSBERG; and on the same side on the middle of the crossguard there are a stamped British Crown and below a supposed letter G. The last mark is the number 83 placed at the back on the pommel and it possibly refers to the ancient 83rd REGIMENT OF FOOT originated in Dublin, Ireland. Features and some Observations: yataghan type blade of carbon steel, fullered on both sides, with a spear point, single edge and just a smooth false edge of 190 mm approximately. The steel crossguard has a large muzzle ring with a "cock's comb" at its top, and a straight quillion with "button finial" at its lower place. The hilt is made up by a full tang, which it gradually grows thinner until reaches the join with the steel pommel (*), and it also shows the black pressed-leather grip scales adjusted by four rivets on its left side and by three others on the right (**), moreover a screw tightens the steel spring which it has the block with the inner nail that allows the bayonet is attached to the rifle muzzle pressing the button located on its left side. The T slot is chamfered (like the Chassepot style) to fit the stud of the barrel located on the right side (***). The black leather scabbard presents steel mounts forming the mouth piece with its oval frog stud and the chape with a truncated cone style tip, both of them having the neccesary staples at their back faces. Noteworthy: the curved shape of the scabbard that was designed for a suitable housing of the yataghan blade, the backed sewing of its leather, and the lack of internal throat springs that usually hold the blade into the scabbard preventing undesirable movements. Comments:Saber-Bayonet with superb design and construction, and a notoriously weightier blade than other "Yataghans" from my collection (according to several written sources, the blades manufactured in United Kingdom were barely lighter than those provided by Germany). Performing my own saber-bayonets fencing style with this beauty I had some opportunities to test "that" weighty blade and I felt myself very comfortable with it, but I had no more chances to continue with the proofs because its left grip scale is very damaged. Two negative and evident points: 1_ the left grip scale that before I mentioned that is in bad state, being understandable because in past era its handle leather was underwent climatic and humidity changes in addition to the destructive effects produced by the acidity of the hands perspiration from its far owner (situating this bayonet in trainings and combats, it was rarely given the necessary care for the hilt area because the blade ever was the most importat thing to give a suitable maintenance); and 2_ the scabbard which was made in a weak leather and I would have preferred a metallic one, obtaining more resistance against climatic changes and serving as a weapon for a counterattack against one or several adversaries in case of loss, breakage or another inconvenece with the bayonet or its blade. Putting aside those undesireable details I must mention the soft stains that they do not offer any oxidation or damage signals on the polished steel blade; in fact, they give a "cool vintage look" to the whole structure and accentuating on it the patina placed on all the other metal parts of this bayonet. Something more to comment: I decided to buy this bayonet knowing the state that I mentioned (its seller had emphasized about it in his web publication where this piece was uploaded showing some photos of its state and he again remembered me at the time of the purchase) but I did not mind about the damage, because for me it was a nice possibility of having a very representative bayonet of an ancient era, and also to know a little about the material used for the grip scales which it was bovine leather; even it is appreciated the tiny hair into the internal rectangular strips used for give form to the structure of such covers. Undoubtedly for me, it was one of my best acquisitions because an opportunity like this was not going to happen again. Clarification I: there are several points which I have marked with asterisks to enable their reading and understanding.
(*) The tang shows several different thicknesses: the area closed to the crossguard shows .27 inches (7 mm) from above and .18 in (4.5 mm) from below, and it is go becoming thinner through all the way until to reach the join with the pommel, showing other measures as .16 in (4 mm) from above and .10 in (2.5 mm) from below. (**) Unfortunately the cover of the left grip scale has got almost 35% in its appearance, showing the inner physiognomy constituted by its leather strips though they admirably still keep themselves fixed to the tang. It was regrettable that the half of that cover had several cracks on the rivets areas and they tended to leave off their places, the only way that I could find to joint them again was gluing the cracked parts with vinyl glue, and although it was not the right procedure at least I can fix that fragile area for undetermined time. (***) The upper hilt area shows both, the tang and the borders of the grip scales with a slight concave shape getting the appropriate adaptation to the barrel curvature at the moment that the bayonet is fixed, and this feature together with its muzzle ring that is born flush with the tang and the chamfered T slot from its pommel, allow that the rifle/musket barrel is aligned without difficulty. These profits have given to this saber-bayonet the added term "bar on barrel" since that it was exclusively designed for that fixing style: the bayonet stud welded to the right side of the firearm barrel and very closed to its muzzle. It should not be confused with the other system used by the Pattern 1858saber-bayonet called "bar on band", which the ring is NOT born flush with the tang but it rises over a few millimeters more compared to the P-1856, adding that its hilt upper back is flat and straight, and the pommel has no chamfered edges on its T slot. Clarification II: Two versions of saber-bayonets were designed for the two types of short rifles knew under different names:
1_ Enfield Pattern 1856 "bar on barrel" Short Rifle, also known as Pattern 1856 Nº 1, Pattern 1856 Army Short Rifle, P-1856 Type I or simply P-1856. For this type of rifle, the bayonet was exclusively designed to be fixed to the stud/bar soldered on the barrel.
2_ Enfield Pattern 1858 "bar on band" Short Rifle, sometimes known as Pattern 1856 Nº 2, P1858 Short Rifle, other times as P-1856 Type II or P-1858. And for this type of rifle, the bayonet was obviously designed to be fixed to the stud/bar placed on the first band more closed to the muzzle of barrel. Note: these two types of rifles had two bands that adjusted the barrel and the stock, and usually they can be found made of iron (destined for Army) or brass (for Navy). Clarification III: I had before mentioned that the number 83 located on the bayonet pommel may have been the one corresponding to the 83rd REGIMENT OF FOOT from Dublin, and I based myself this assumption because this model of bayonets from Solingen (Germany) were only acquired by Volunteer Units, and in the case of this Regiment there are some informations demonstrating that this kind of saber-bayonets were part of these Units that served to the Britannic Majesty. Many of you will ask for an adecuate explanation about these militias, for that reason I have transcribed the definition that I found in the excellent website called Old-Smithy (the page is Bayonets Terms, and I am going to add the link if you need more data): "Volunteer units were a form of militia unit, and not part of the standing army, these were common in the UK before WWI. Often they were equipped with the same arms as the standing army but weapons were bought privately and do not have military acceptance marks and may have slight differences (brass instead of steel scabbard mounts for example)". Moreover, in other page of this same website (The Yataghan Style bayonet) you can access to more details about the bayonets used by these militia units: "Various volunteer bayonets were made based on the 1856 style blade. These can be found with steel or brass pommels and cross guards. Bayonets are often unmarked or have German Solingen/WKC makers marks, and with heavier blades than the normal military issue blades". And here I have added some points to have in mind which you may find on Volunteer Bayonets: · crossguard, pommel, or leather scabbard mounts manufactured in brass · heavier blades than the standard ones · slighty short hilts · grip scales made in wood or bakelite, and with no cleaning holes · pommel slots for fixing may be shorter, modified or without any slots Value:4,5 score points over 5. Links: http://www.solo-bayonetas.com/2012/10/reino-unido-united-kingdom_14.html (this is my other blog with the spanish data!)
Getting advantage from the brass hilts of saber-bayonets
Many times, we acquire saber-bayonets which they have brass hilts and although these have got well defined grooves for a comfortable grip, when we perform the fencing with saber-bayonets, after 10 o 15 minutes our hands begin to feel uncomfortable with their metal hilts. Ok, we should not sell our appreciated acquisitions and try to find other saber-bayonets which may have the proper features for our needs.
In case that this trouble appears, please remember the following technique that I suggest to you.
Fig. A and D show the traditional way to hold/grip saber-bayonets: the Little and Ring Fingers adjust firmly the hilt, Middle Finger adjust firmly too, but consciously in a more smooth way, and the Index and Thumb Fingers realize a little adjust, allowing us we may articulate them while we perform the fencing (in this traditional way the Index and Thumb always stay behind the crossguard).
Fig. B and E show my suggested technique: 1st: the Little and Ring Fingers adjust firmly the hilt, and 2nd: the Middle Finger adjust firmly too, but consciously in a more smooth way (up to this 2 points I used the same traditional way, but now in the 3 appears the change), 3rd: the Index Finger must to be introduced into the "Hook" (the true term is "Quillion") getting in this way more surface area and length on the hilt allowing us to get a comfortable grip. After this step, the Index and Thumb Fingers remain realizing a little adjust as the Traditional way teachs us.
Fig. C and F show both hands succesfully benefiting with the technique for the brass hilts of each saber-bayonets.
And here I´ve posted my video from my You Tube channel:
Note: Though sometimes I refer to this technique as "my technique" but it´s only to make the diference between that one usually used by a lot of saber-bayonet fencers and this one used by me. Please, do not forget that this technique is not a creation of mine, there are enough data in the Web about this ancient technique used in past centuries by swords/sabers/daggers masters and warriors, and with great success. My only work was rescue it for to be applied in my fencing with saber-bayonets to get advantage with their metal hilts. Are you wondering about the bayonets used in the video and photos?
Right hand: a french saber-bayonet for the Infantry rifle CHASSEPOT MODÈLE 1866 made in France in the "Imperial Arsenal of Mutzig in March 1868" (sabre-baïonnette française pour le fusil d'Infanterie CHASSEPOT Modèle 1866 "Manufacture Impériale de Mutzig Mars 1868"), it has the distinctive "Yataghan" (or double curved) blade.
Left hand: a saber-bayonet for the Infantry rifle REMINGTON "MODELO ARGENTINO 1879" a.k.a "Remington Patria" or "Patria 1879", this first issue (Tipo/Type A) was made in Solingen and it carries the following marks: right ricasso FÁBRICA DE ARMAS DE W.R.KIRSCHBAUM SOLINGEN and left ricasso MARCA DE FÁBRICA (curved as a bow) over a "Knight Helmet".
Yeah, more images!!!
My REMINGTON "ModArg79" Type A surrounded by my two CHASSEPOTMle 1866 (Mutzig 1868 and Châtellerault 1873)
1_ ModArg79Type A 2_ ModArg79 Type D (for export) 3_ ModArg79 Type B (with the mark on left ricasso: RA into an oval) 4_ ModArg79 Type C (without RA into an oval) Not Available at this time
Ah! For those fellas who do not accept this "different style" and they certainly believe in the use of the bayonet with its respective rifle, I posted here some images from a book which you will find it very interesting: BAYONET, Department of the Army Field Manual FM 23-25, from 22 June 1953 (Great book!!! It will not dissapoint you!!!)


.jpg)


